DESCRIPTION
Manual Rotisserie (Hand Rotating Grill) is composed of the following parts:
1 Main bracket(steel chrome-plated) 2 Sub bracket(steel chrome-plated) 3 Rotating Rod(stainless steel) 4 Fork(stainless steel) with thumb screws(stainless steel) 5 Handle(stainless steel)
It can be Installed on the ovens(BBQ stoves) to rotate roast whole chicken, roast fish, roast vegetables, etc. Quick to install without tools and easy to carry. With position hold function. The length can be adjusted freely within the effective range.
DIMENSION
For model S4035 supports ovens(BBQ stoves) with inner diameters below 35cm and model L4065 supports ovens(BBQ stoves) with inner diameters below 65cm. They all clamping oven(BBQ stove) wall thickness are not exceeding 40mm. If you are not sure whether your oven(BBQ stove) is suitable, you can provide a picture of your oven(BBQ stove) inner diameters and wall thickness to the customer service online.
Model L4065
Please click on the picture below to purchase the Model L4065
Model AM4078 (Automated Manual Rotisserie)
If you need an Electric Rotisserie, please click on the picture below to purchase the Model AM4078 (Automated Manual Rotisserie)
BRACKET
This product has a (A) main bracket and a (B) sub bracket, and the installation is regardless of front and rear, as long as it is installed opposite. The surface of all the brackets is chrome plated, using 2mm thickness cold-rolled steel plates, with two heights, and using thread locking devices.
INSTALL ON THE OVEN(BBQ STOVE)
NOTE: The oven(BBQ stove) below not included
USE OF AUXILIARY SCREWS IN DIFFERENT OVENS(BBQ STOVES)
NOTE: The below green wire frame is the shape of the clamped oven(BBQ stove) wall,The auxiliary screws is M5*35mm wing screw.
Option1:Auxiliary screw in the lower hole
Option2:Auxiliary screw in the upper hole
Option3:No auxiliary screws
POSITION HOLD
When you are tired by hand rotation, you can find a suitable position to keep. Can be kept in horizontal or vertical position.
STEPS FOR POSITION HOLD
Step1 Pick up
Step2 Push forward
Step3 Put down
INSTALLATION STEPS
Step1
Turn the locking screws on the main bracket and sub bracket counterclockwise to loosen to the appropriate position.
Step2
Clamp the main bracket and sub bracket to the appropriate position of the oven(BBQ stove) (sold separately, the same below), Turn the locking screw clockwise not to tighten, and choose whether to use auxiliary screws according to the shape of the oven(BBQ stove).
Step3
Screw the Rotating Rod to the handle, do not tighten, put it on the main bracket and sub bracket to test that it can rotate smoothly, and then tighten the locking screws (the same as the auxiliary screws).
Step4
The fork through the Rotating Rod, screw the thumb screw to the fork. After loading the food, adjust it to the proper position and tighten the thumb screws. Place it in the proper height on the main bracket and sub bracket to rotate by hand.
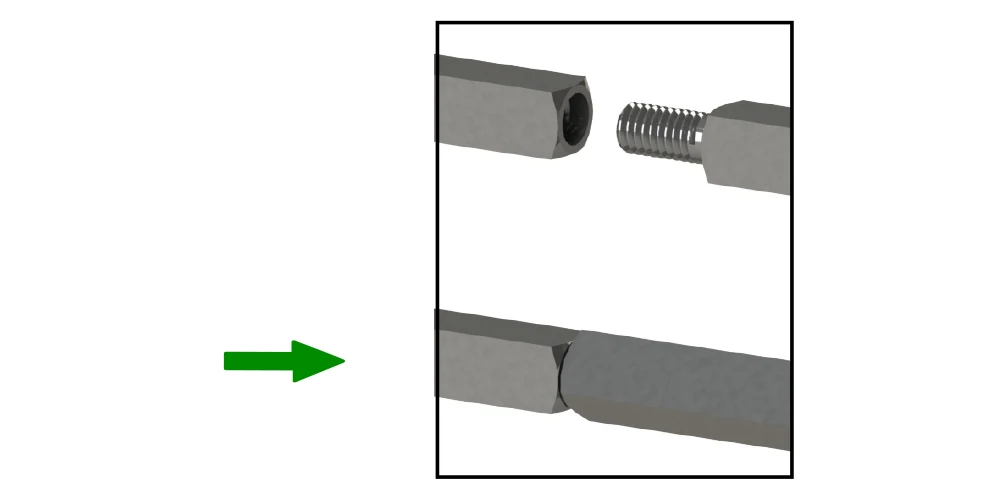
NORMAL MISALIGNMENT
NOTE: Thread processing needs to have a certain clearance, so it is difficult to have the same plane after the rod is tightened, and there will be a normal misalignment. At this time, you only need to loosen the rod a little, then put on the fork to the rod after the plane coincides. Tighten the rod after all the food is loaded.
Purchase accessories separately
BBQ Motor
Please click on the picture below to purchase the BBQ Motor
Extension Rod
Please click on the picture below to purchase the Extension Rod
Fork
Please click on the picture below to purchase the Forks
ROTATE ROAST FISH
Please click on the picture below to purchase the ROTATE ROAST FISH
ROTATING SKEWERS
Please click on the picture below to purchase the ROTATING SKEWERS
Auto Flip Skewer
Please click on the picture below to purchase the Auto Flip Skewer
Auto Rotating Grill
Please click on the picture below to purchase the Auto Rotating Grill


 배송기간
배송기간